Tutorials
Video tutorials can be found in our
 YouTube channel.
Additional cookbooks related to GigaMesh on the
Tools for Archaeology and Cuneiform Studies in the Modern Era – TACUME's gitlab page on
Open Educational Resources for 3D.
This is an application-based manual for the GigaMesh Software framework.
It shows basic processing steps typically and also very often used within our projects.
Many of the steps can be combined for more advanced tasks.
Theoretical concepts can be found in the publications section.
For earlier versions of the manual
click here.
Topics found in the manual:
- 00. Video Tutorials
- 01. First Steps
- 02. Labeling and Function Values
- 03. Mesh Cleaning
- 04. Profile Lines and Cross Sections
- 05. Unwrappings
- 06. Extrude Profile Lines
- 07. Distance Visualization
- 08. Distance Measurement between Points
- 09. Volume
- 10. Colorramps
- 11. MSII Filtering - Feature Vectors
- 12. Export Screenshots
- 13. Apply TPS RPM Transformation
01. First Steps
Note, that there is an alternate tutorial for first steps with GigaMesh on YouTube. This video was also published using heiDOK --The Heidelberg Document Repository -- having the DOI:10.11588/heidok.00024463.
1.1. The GigaMesh User Interface
After starting GigaMesh, open a mesh via File → Open (ctrl+ o) and
the following dialogue. Various 3D-formats are supported. If an error occors,
load the file in MeshLab (freeware), export it as .ply and enable binary
encoding. GigaMesh only displays vertex colors. On the top there is the menu
bar where most commands are located. In the bar below, there are buttons for
light settings, for reloading the current mesh (e. g. if something unwanted
happens) and for the inspection view which shows erroneous vertices. Presets
for matted and metallic rendering are also found there, as well as shortcuts
for the background grid and transparency. In the left side bar some information
is displayed, important for this manual are the DPI, Label ID and SelMVerts.
The right side bar offers some options for the surface representation. If the
mesh is not showing what it should, choose another option and then the first
option again. In the menu below, there are options to move the plane, lights
and camera. There are shortcuts for many steps described in this manual. They
can be displyed via ? → Keyboard Shortcuts.
1.2. Settings
Under Settings are some parameters of interest. The background can be
modified here (grid or circles, to put it in front, choose Settings → Grid shift depth),
and it can be chosen between orthographic or perspective view.
Furthermore, the DPI-Settings (shift + F7) (zoom, see chapter 'Export
Screenshots') and lighting settings aswell as the specular- and shininess-
settings are found here. Presets for these functions are found in the button-bar.
Under Colors several options are found, perhaps of interest is the
Backface Color (color of the unscanned backside of a surface). There is also
a Sketch Rendering option and its settings.
1.3. Navigating
Check if Move Camera is set in the right side bar. To move the camera around the mesh, click and hold the left mouse button to move the camera around the central point. Use the right mouse button to drag the mesh without turning it. To zoom, use the mouse wheel or Settings → Ortho Scale (Set DPI). For a more precise orientation, keyboard shortcuts can be used for rotation steps of 1° or 90° in all directions. Choose ? → Keyboard Layout to display these shortcuts. For a even finer orientation, use View → Rotate - e. g. Roll and fill in e. g. (-)0.5 for a rotation of 0.5 degree.
If needed, the rotation center can be set to a selected point on the mesh
(ctrl + left click) via View → SelPrim to View Reference. To save the
current orientation of the mesh, press F6 and save the file. A transformation
matrix is created in a .tex file in the mesh directory. This matrix can be
applied again via Edit → Apply 4x4 Matrix - All Vertices.
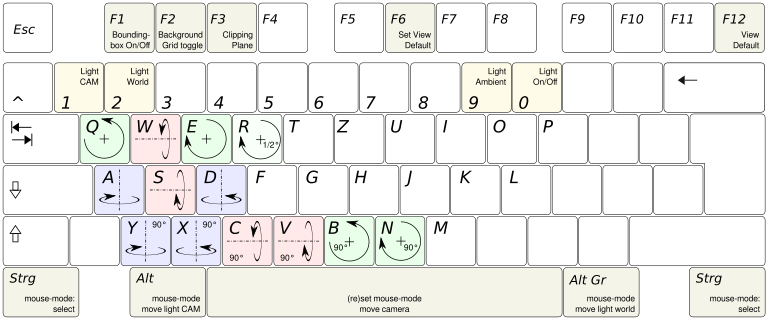
Figure 1:
Keyboard Layout for Navigation
1.4. The Mesh Plane
A plane is always present in the workspace. It is needed for several operations
and can be used e. g. as clipping plane (View → Mesh Plane as Clipping
Plane) or to calculate and visualize distances to the mesh (hight maps). It
can be shown/hidden it via View → Mesh Plane (shift + F1).
There are several options to set this plane. Most intuitive is Select →
Plane - 3 Points where the plane is defined by three points on the mesh. To
select them, hold ctrl and click on the mesh. Another, and probably the best,
option is to orientate the mesh precisely (has to be done anyway) and then
choose Select → Plane - Set HNF by View. Here the plane is set orthogonal
to the camera position. Turning the camera 90° allows to move the plane in
position (holding shift and dragging the plane with the right mouse button).
The plane can be moved precisely with the same keyboard shortcuts as the camera
while holding shift.
1.5. Scaling and Skewing
To scale a mesh, choose Edit → Apply Scale/Skew - All Vertices. Enter the scale factor in the appearing box, e. g. 0.5 for half the size or 2 to double the size of the mesh.
For skewing use the same menu option, but instead of entering one value it is nessary to enter three values for x-, y- and z-direction. E.g. for scaling by a factor of three only in z-direction enter
1 1 3
In case more complex transformations are needed it is possible to enter a 4x4 transformation matrix by choosing Edit → Apply 4x4 Matrix - All Vertices. You have to enter 16 values e.g. for uniform scaling:
(scale factor) 0 0 0 0 (scale factor) 0 0 0 0 (scale factor) 0 0 0 0 1
Another example is the scaling by a factor of two and a 90° rotation about the z-axis:
0 -2 0 0 2 0 0 0 0 0 2 0 0 0 0 1
1.6. Transparency
Transparency can be enabled via View → Transparency or the button in the button bar. The settings can be adjusted via View → Transparency Settings. It can be set dependend of the function value and so gradients of transparency can be created, e.g. in combination to the Distance to Point or Distance to Plane functions. Transparency can be toggled using the button in the toolbar:
